Drying is a unit operation that uses heat energy to vaporize the moisture (water or other solvents) in materials and removes the vaporized moisture using airflow or vacuum. Drying operations are widely applied in the preparation processes of raw materials, Chinese medicinal materials, intermediates of formulations, finished products, and biological products. Drying equipment can be classified into batch drying and continuous drying based on the operation mode, with continuous drying equipment being commonly used in industries due to its high degree of automation and large output. Based on operating pressure, it can be divided into atmospheric drying and vacuum drying; based on heating methods, it can be classified into direct heating drying and indirect heating drying; based on heat transfer methods, it can be categorized into conduction drying, convection drying, radiation drying, and dielectric heating drying.
1. Usage and Maintenance of Box Dryers
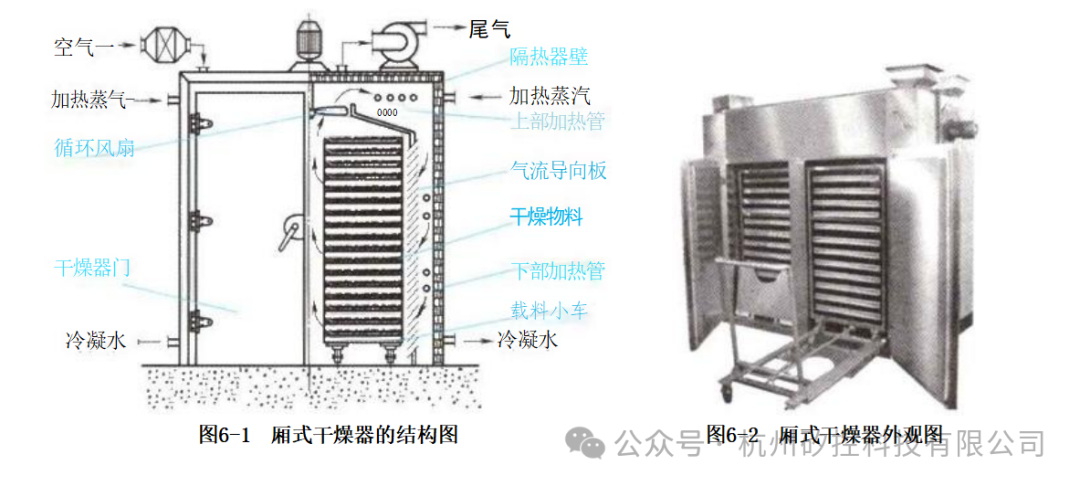
Box dryers primarily achieve drying by transferring heat from hot air to the surface of wet materials. Advantages include simple structure, low equipment investment, and strong adaptability. Disadvantages include the need to load and unload materials for each operation, high labor intensity, and low equipment utilization.
(1) Understanding the Equipment
1. Main Structure
Box dryers mainly consist of a box body, fan, heating system, material tray, and electrical control box. Small units are referred to as ovens, while larger ones are called drying rooms.
2. Working Principle
Box dryers generally operate in batch mode, primarily using electric energy or steam as the heat source, utilizing air as the heating medium to heat the materials in the trays, thereby achieving drying.
3. Drying Characteristics
(1) Simple structure, easy operation, and wide applicability.
(2) Materials are not easily damaged, and dust generation is minimal.
(3) Longer drying time and lower efficiency.
(4) Uneven drying of materials and high labor intensity.
(2) Operating the Equipment
1. Usage Method
(1) Check the machine status indicator, turn on the power, and ensure the power indicator light is on.
(2) Turn on the fan and check if the fan direction is correct.
(3) Measure the temperature and display the temperature inside the oven.
(4) Set the constant temperature control and turn on the heating knob.
(5) Load the materials onto the tray and push it into the oven for drying.
(6) After drying, turn off the heating system and wait for the temperature to drop below a safe level.
(7) Turn off the fan, turn off the power, remove the materials, and replace the status indicator.
2. Maintenance
(1) During daily production, check the steam pipeline and door seals for leaks; if any are found, they should be repaired immediately.
(2) If any abnormal phenomena occur during operation or if the control cabinet alarm system goes off, the machine should be stopped for inspection.
(3) After long-term storage, the first use or every six months, the lubricating oil in the fan should be replaced.
(4) The machine should undergo maintenance once a year.
2. Vacuum Dryers
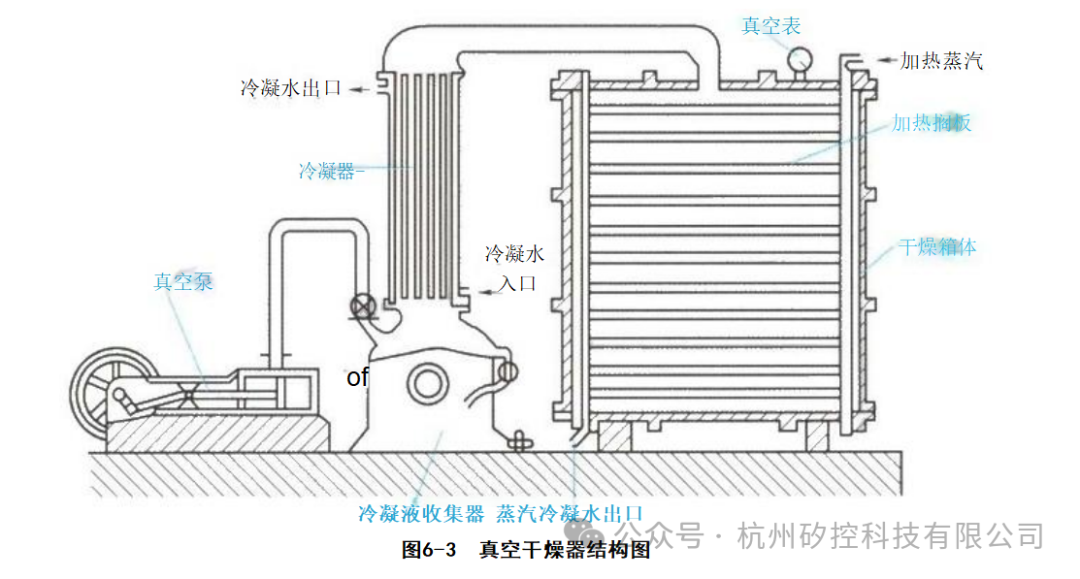
The vacuum drying process involves placing the material to be dried in a sealed drying chamber, then applying vacuum while continuously heating the material, causing the moisture to evaporate. Due to the lower boiling point of moisture under vacuum conditions, the drying temperature is not high, making it suitable for heat-sensitive and easily oxidizable materials.
(1) Understanding the Equipment
1. Main Structure
Vacuum dryers mainly consist of a drying chamber, heating shelves, vacuum pump, and material trays.
2. Working Principle
Vacuum drying is conducted under negative pressure. During operation, the material is evenly spread in the trays, which are then placed on the shelves. The chamber door is closed to create a vacuum, and heating is applied. The heating medium enters the inner layer of the shelves, and the material receives heat through direct thermal conduction, causing the moisture to vaporize and achieve drying.
3. Drying Characteristics
(1) The temperature of the material during drying is low, with no overheating, allowing moisture to evaporate easily. The dried product can form a porous structure with good solubility, rehydration, color, and taste.
(2) The final moisture content of the dried product is low, loose, and easy to crush, ensuring quality.
(3) The drying time is shorter, and the speed is faster, suitable for drying heat-sensitive materials.
(4) The vacuum level and heating temperature range used during drying are broad, providing good versatility.
(5) Equipment investment and power consumption are higher than atmospheric hot air drying.
(2) Operating the Equipment
1. Usage Method
(1) The dryer and trays must be cleaned before use, then place the trays with materials inside, close the sealing door, and tighten the handwheel. (After vacuuming, the sealing door will press tightly against the dryer, and the tightened handwheel will fall off; do not tighten the handwheel again to avoid damaging it when the vacuum is released.)
(2) Introduce steam into the drying rack and heat to the required drying temperature.
(3) If sterilization is required, both the interior of the dryer and the materials must be sterilized.
(4) Connect the cooling water to the vacuum pump, start the vacuum pump to achieve the appropriate vacuum level for the selected vacuum pump, and the material will begin to dry. (Note: Under vacuum conditions, gas molecules move very slowly, so the thermometer on the vacuum dryer cannot display the true temperature of the material; it only indicates the relative temperature. To accurately measure the material temperature, a glass rod thermometer or platinum resistance temperature sensor should be used.)
(5) Under the conditions of meeting heating temperature, vacuum level, etc., determine the drying cycle based on the process and experience of the material being dried.
(6) To shut down, follow these steps:
① Stop the heating system completely.
② Stop the vacuum pump.
③ Open the vent valve.
④ Open the solvent discharge valve to drain all the solution.
⑤ Wait for the vacuum gauge needle to return to the “0” position, then open the sealing door of the vacuum dryer.
⑥ Remove the dried materials.
2. Maintenance
(1) If the vacuum dryer is not used for a long time, wipe the exposed electroplated parts clean and apply neutral grease to prevent corrosion, and cover it with a plastic dust cover, placing it in the drying room to avoid moisture damage to electrical components.
(2) The vacuum pump should not run continuously; therefore, when the vacuum level reaches the requirement, first close the vacuum valve, then turn off the vacuum pump power. When the vacuum level is lower than the requirements for the dried items, open the vacuum valve and the vacuum pump power to continue vacuuming, which can extend the life of the vacuum pump.
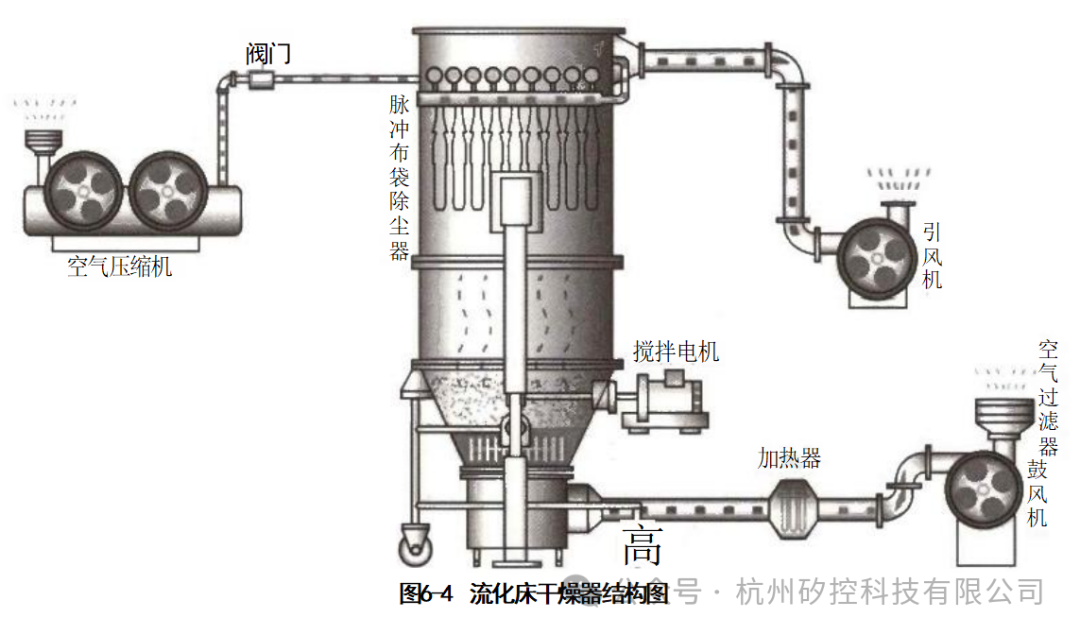
3. Fluidized Bed Dryers
Fluidized bed drying, also known as boiling drying, is a drying technology developed in the 1960s.
(1) Understanding the Equipment
1. Main Structure
It mainly consists of a drying chamber, material collection chamber, heating system, and filtration system.
2. Working Principle
The working principle of fluidized bed dryers is that granular solid materials are added to the fluidized bed dryer through a feeder, and clean air, after being filtered and heated, is sent into the bottom of the fluidized bed through a blower, contacting the solid materials and forming a fluidized state, achieving heat and mass exchange between gas and solid. Dried materials are discharged from the discharge port, and waste gas is expelled from the top of the fluidized bed, where solid powder is recovered through a cyclone dust collector and bag filter before being released.
3. Drying Characteristics
(1) In fluidized bed drying equipment, the fluid and solid particles are fully mixed, providing many opportunities for surface renewal, greatly enhancing heat and mass transfer between the two phases, resulting in a relatively uniform temperature within the bed. Additionally, it has a high heat capacity coefficient (or volumetric heat transfer coefficient), with a large production capacity, capable of drying hundreds of tons of materials per hour.
(2) Compared to traditional box dryers or rotary drum dryers, fluidized bed drying equipment has the advantages of shorter material residence time and higher drying rates; it is also suitable for drying certain heat-sensitive materials.
(3) The equipment is simple, easy to manufacture, maintain, and scale up.
(4) The residence time of materials in fluidized bed drying equipment can be adjusted according to process production requirements. When the moisture content requirements of the product change or the moisture content of the raw materials fluctuates, adjustments can be made accordingly.
(5) The same equipment can perform both continuous and batch operations.
(2) Operating the Equipment
1. Usage Method
(1) Take more than 10g of material from the prepared wet material and use a rapid moisture meter to measure the moisture content W of the material to be dried.
(2) Start the fan and adjust the flow to the specified reading. Connect the preheater power supply and gradually increase its voltage to around 100V to heat the air. When the gas inlet temperature of the dryer approaches 60°C, open the air inlet valve, close the vent valve, and adjust the valve to restore the flow meter reading to the specified value. At the same time, power the dryer, maintaining the heating voltage to keep the dryer outlet temperature close to the inlet temperature during the preheating stage.
(3) After starting the fan, before opening the air inlet valve, pour the wet material into the feed hopper and prepare the discharge receiving hopper.
(4) When the air inlet temperature (60°C) and outlet temperature are basically stable, record relevant data, including the values of dry and wet bulb thermometers. Start the DC motor, adjust the speed to the specified value, and begin feeding. At the same time, start the stopwatch to record the feeding time and observe the fluidization of the solid particles.
(5) After feeding, maintain the inlet temperature T₁, insulation voltage, and gas flow meter reading constant.
(6) When solid material begins to overflow continuously from the discharge port, press the stopwatch again to record the discharge time.
(7) Continuous operation for about 30 minutes. During this period, record relevant data at regular intervals (e.g., every 5 minutes), including the solid material outlet temperature T₂. When processing data, take the average of several records after the operation stabilizes.
(8) Turn off the DC motor knob to stop feeding, simultaneously stop the stopwatch recording feeding and discharge times, open the vent valve, close the air inlet valve, and cut off the heating and insulation power supply.
(9) Weigh the outlet material from the dryer and measure its moisture content W₂ (using the same method as W). Remove the remaining wet material from the feeder, weigh it, and determine the actual feeding and discharge amounts. Use a vortex gas pump to remove the remaining material from the dryer and weigh it.
(10) Stop the fan and restore everything (including placing all solid materials in one container).
2. Maintenance
(1) Check the induced draft fan and pneumatic components once a month; the entire machine should be overhauled once every six months.
(2) Keep the machine clean; after the equipment has finished working, thoroughly clean the work area and equipment; the induced draft fan should be cleaned and maintained, lubricated regularly; the air filter of the pneumatic system should be cleaned regularly, and the pneumatic valve piston should be intact and reliable; the air filter should be cleaned or replaced every six months; temperature sensors and pressure gauges should be checked every six months to ensure accuracy.
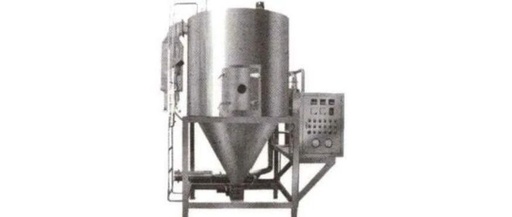
4. Spray Dryers
(1) Understanding the Equipment
1. Main Structure
It mainly consists of an atomizer, drying chamber, and heater.
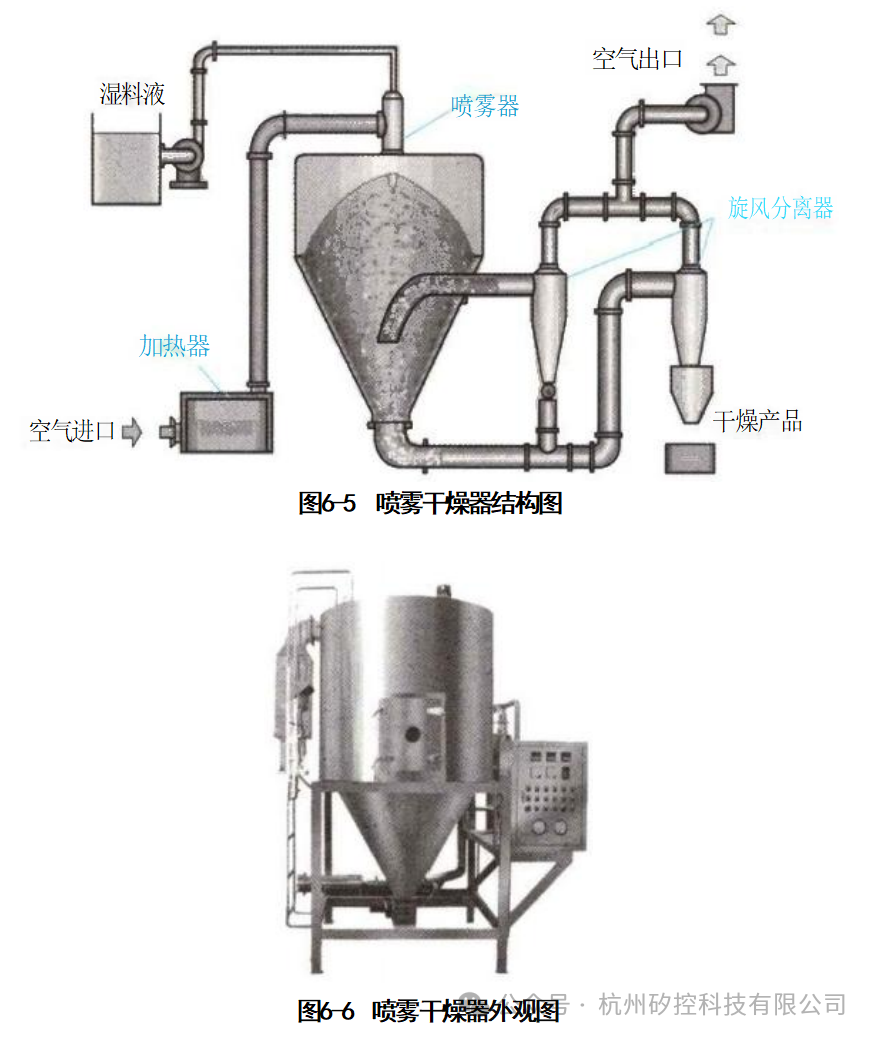
2. Working Principle
Hot air is introduced at the top of the drying tower while the feed liquid is sent to the top of the tower, where it is atomized into mist-like droplets by the atomizer. These droplets have a large surface area and, upon contact with the high-temperature hot air, the moisture rapidly evaporates, turning into dried products in a very short time. The temperature of the hot air entering from the top of the drying tower significantly decreases upon contact with the droplets, increasing in humidity, and is expelled as waste gas by the exhaust fan, with the fine particles carried in the waste gas being recovered by separation devices.
3. Drying Characteristics
(1) Fast drying speed, suitable for continuous large-scale production.
(2) During the constant rate stage, the temperature of the droplets approaches the wet bulb temperature of the hot air used, ensuring that the product quality is not affected by high-temperature air, resulting in good dispersibility, flowability, and solubility of the product.
(3) The production process is simple, easy to control, and facilitates automation.
(4) Due to the large volume of air used, the drying volume increases, resulting in a lower volumetric heat transfer coefficient.
(5) The waste gas has a low dust content, providing a good production environment.
(2) Operating the Equipment
Usage methods are as follows.
(1) Prepare the material to be sprayed, ensuring it is thoroughly emulsified and homogenized through a homogenizer and passed through an 80-mesh sieve (to prevent clogging the atomizer and pipelines), and place it in a stainless steel bucket for later use. Additionally, prepare a bucket of purified water for cleaning the atomizer and spray chamber. Install the peristaltic pump’s feed pipe securely, fastening it with eight nuts at the front end of the inlet to prevent it from floating and sucking in air, and place it in the material bucket for later use.
(2) Check that the butterfly valves on the pipeline connecting the dehumidifier and collection bucket are all in the open position, the air damper on the spray tower is fully open, the spray chamber door is securely closed, and all quick-release clamps on the connecting pipelines are installed correctly. The exhaust valve of the air compressor should be open, and the vent valve should be closed, ensuring good connection of the air compressor pipe.
(3) Start the working procedure by pressing the switch of the dehumidifier, closing the air switch of the spray dryer, adjusting the air pressure of the air compressor (pull out the black button to adjust, then press it back in), clockwise rotate to release the red emergency stop button, and open the LCD operation screen. Wait for 15 seconds for it to automatically enter the operation interface, then set the process parameters: set temperature, time, etc. Start by turning on the induced draft fan, dehumidifier, and electric heating switch (the electric heating switch should be set to automatic; otherwise, it will not stop heating when the set temperature is reached and will continue to heat). Preheat the system until the monitored inlet temperature reaches the set temperature, and the outlet temperature stabilizes between 80-90°C. Then, open the atomizer for 30 seconds, and subsequently turn on the peristaltic pump switch, adjusting the speed to between 12-18 (depending on the material). Initially, run the peristaltic pump slowly to avoid exposing the feed pipe to air (the high temperature of the atomizer, lacking new material for cooling, can cause a small amount of liquid to dry rapidly and clog the atomizer). The arrow on the atomizer should point to “→”; press the “Start” button on the atomizer to begin feeding the material. When the material enters the atomizer and begins to spray, turn on the vibrator (double air hammer), observe the atomization situation and outlet temperature. If the outlet temperature exceeds 90°C, slowly adjust the peristaltic pump speed (by 0.5-2 each time), continue to observe the outlet temperature, and stabilize it at 86-88°C, which indicates normal spray flow (depending on the material’s viscosity, solid content, etc.). Always monitor the outlet temperature and adjust the optimal material flow rate.
(4) Shutdown procedure: After all materials have been absorbed, immediately place the feed pipe into the cleaning water bucket, use purified water to spray clean the atomizer, adjust the peristaltic pump speed to around 15 (water has no solids, making it difficult to spray dry), and after 5 minutes, check if the feed pipe has been cleaned with tap water. Run for another 2-3 minutes until the atomizer is clean. Turn off the peristaltic pump, open the clamp on the pump to allow the water to flow back into the bucket. Wait for 3-5 minutes until the atomizer finishes spraying the remaining water, then close the atomizer. When no mist appears, the electric heating and vibrator can be turned off, and wait for natural cooling. When the inlet temperature drops below 150°C, the chamber door can be opened, and use an air gun to blow into areas where material has accumulated, paying attention to all corners, and directing the air at the bends of the bottom pipe to facilitate material recovery through the cyclone separator. After blowing the powder clean, close the chamber door, and after blowing for 1 minute, turn off the induced draft fan and dehumidifier. Close the butterfly valve at the discharge port, remove the collection bucket, and pour out the powder for moisture-proof packaging.
(5) Cleaning the spray tower: Loosen the quick-release clamp on the right side of the collection bucket’s pipeline, then remove the clamp at the bottom of the spray tower to rotate this section of the material pipe aside, placing a large basin at the bottom of the spray tower to collect the material water. Open the atomizer and peristaltic pump, placing the feed hose into the cleaning bucket to draw water, press the “Start” button to begin peristaltic suction, and when spraying begins, quickly adjust the speed to 100, maximizing the water spray to clean the atomizer and internal chamber walls for 3-5 minutes. Follow the operating procedure to first turn off the peristaltic pump to drain the water from the material pipe, wait 2 minutes, then turn off the atomizer, press the emergency stop button to shut down, and turn off the air switch in the control cabinet. Open the chamber door and use a water hose to rinse the internal chamber walls in areas that are not clean, being careful not to spray water into the holes next to the top atomizer (to prevent water from backflowing into the heater), thoroughly rinsing the inner wall clean.
(6) Cleaning surrounding components: Remove the two sections of material pipes connected to the cyclone separator, the discharge port butterfly valve, collection bucket, clamps, and silicone gaskets, clean them thoroughly, and let them dry. When cleaning the cyclone separator, first remove the surrounding connecting components, then ensure the exhaust valve of the dehumidifier is closed (to prevent water from backflowing into the dehumidifier), and direct water at the inlet of the separator, using a basin to catch the water at the discharge port to avoid splashing into the dehumidifier and damaging the motor. Repeat rinsing from multiple angles until the wastewater is clear and colorless. After all components are dry, reassemble the pipeline.
5. Freeze Dryers
(1) Understanding the Equipment
1. Main Structure
It mainly consists of a pressure gauge, evaporator, throttle valve, condenser, and cooler.
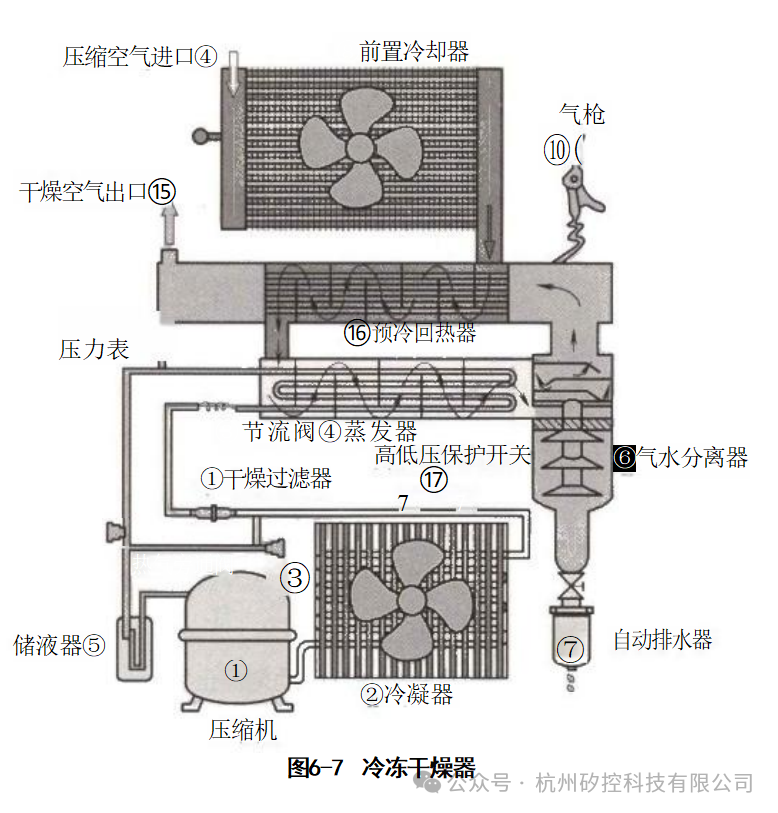
2. Working Principle
The water solution to be dried is placed in the drying chamber and pre-frozen, with the temperature adjusted below the lowest eutectic point, completely freezing it before applying vacuum to remove moisture through sublimation of ice, achieving the drying purpose.
3. Working Process
Moist, high-temperature compressed air flows into the pre-cooler (specifically for high-temperature types) to dissipate heat before entering the heat exchanger, where it exchanges heat with the cold air discharged from the evaporator, lowering the temperature of the compressed air entering the evaporator.
The heat-exchanged compressed air flows into the evaporator, where it exchanges heat with the refrigerant through the evaporator’s heat exchange function. The heat from the compressed air is carried away by the refrigerant, rapidly cooling the compressed air, causing the moisture in the humid air to reach saturation temperature and quickly condense. The condensed moisture forms droplets, which are separated from the air by a high-speed rotating gas-water separator, and the separated water is discharged from the automatic drainage valve.
The cooled air flows through the air heat exchanger, exchanging heat with the incoming high-temperature humid air. The cooled air, having absorbed heat from the incoming air, increases in temperature, while the compressed air also undergoes secondary condensation in the refrigeration system, exchanging heat with the high-temperature refrigerant, ensuring that the outlet temperature is sufficiently raised to prevent condensation in the outlet air pipeline. At the same time, it fully utilizes the cold source of the outlet air to ensure the condensation effect of the machine’s refrigeration system and the quality of the outlet air.
4. Drying Characteristics
(1) The product quality is stable, with a loose texture and good solubility.
(2) Particularly suitable for drying heat-sensitive drugs such as biological products.
(3) High equipment investment costs, high product costs, and expensive prices.
(2) Operating the Equipment
1. Usage Method
(1) Preparatory work before starting
① Check that the power supply voltage and air pressure match the nameplate specifications.
② Fully open the bypass valve and close the inlet and outlet valves of the dryer.
③ Power the dryer (the oil heater will automatically turn on at this time).
④ Open the manual drainage valve of the gas-water separator and close the shut-off valve before the automatic drainage valve.
⑤ Open the air inlet valve slightly to blow out the pre-cooler and evaporator, then close the manual drainage valve and open the shut-off valve before the automatic drainage valve.
⑥ Check for any leaks in the air system.
⑦ Check that all valves and pressure gauges in the refrigeration system are open and check for leaks.
⑧ For semi-closed compressors, check the oil level and oil temperature; the dryer can only be started when the temperature at the bottom of the crankcase exceeds 40°C.
⑨ Some fully closed compressors have electric heaters installed at the bottom of the cylinder; when the ambient temperature is high, power should be supplied in advance for 2 hours before starting the compressor.
⑩ For water-cooled condensers, open the cooling water inlet and outlet valves.
(2) Start the dryer and check that the pressure and temperature of each part are normal.
(3) Shutdown
① Open the bypass valve.
② Close the air inlet and outlet valves (if the shutdown time is short and the compressed air temperature does not exceed 40°C, this valve may not need to be closed).
③ Stop the operation of the dryer.
④ Depending on the length of the shutdown time, determine whether to cut off the cooling water and power supply.
2. Maintenance
(1) Check that the condensation pressure is within the range of 1.3-1.5MPa. For semi-closed compressors, if there is no oil leakage, the condensation pressure can be less than 1.3MPa to save energy.
(2) Check that the evaporation pressure is between 0.36-0.40MPa.
(3) Check the drainage situation of the automatic drainage valve, adjusting the drainage cycle and time according to the season. Regularly clean the filter mesh behind the automatic drainage shut-off valve.
(4) Check that the gas source pressure is not less than 0.6MPa and the temperature does not exceed 40°C.
(5) Check the oil level in the crankcase of the semi-closed compressor.
(6) Check the oil return situation of the semi-closed compressor oil separator.
(7) Check that the oil pressure of the semi-closed compressor is normal; the oil pressure should generally be 0.15MPa greater than the evaporation pressure.
(8) Check the water temperature of the cooling water.
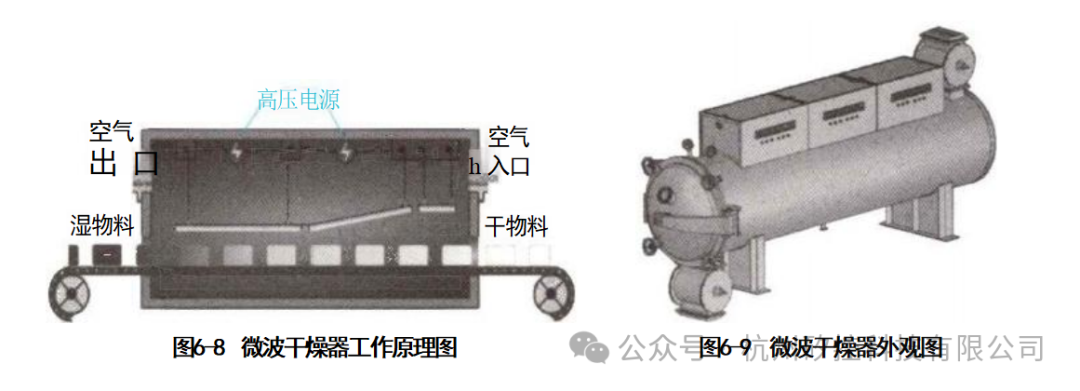
6. Microwave Dryers
(1) Understanding the Equipment
1. Main Structure
Microwave drying equipment mainly consists of a DC power supply, microwave generator, and microwave dryer.
2. Working Principle
This method uses electromagnetic induction or infrared radiation effects to heat and dry materials. Unlike other external heating drying methods, this drying method heats the material uniformly from both the outside and inside simultaneously, resulting in a shorter drying time without overheating, preventing degradation or charring, and producing high-quality dried products.
(2) Operating the Equipment
1. Operating Method
(1) First, check and tighten all fasteners.
(2) Observe, wipe, and lubricate all lubrication points.
(3) Visually check and manually rotate all moving parts to ensure they rotate smoothly.
(4) Check if the conveyor belt is loose or misaligned; check if the V-belt is loose or torn.
(5) Open the furnace door and check and clean any debris or metal parts inside the box, carefully observing if any bolts in the connection seams are loose.
(6) It is strictly prohibited to open the furnace door while the machine is running; ensure the door is closed tightly against the frame.
(7) Start the cooling water pump and check for leaks in the cooling water system, including the magnetron.
(8) Check if the automatic adjustment system is functioning normally; ensure the adjustment device rotates smoothly.
(9) Check if the feeding mechanism is functioning normally; do not operate the microwave without material.
(10) Close the main power supply of the central controller in the control room and check if all control cabinets are connected to the three-phase power supply.
(11) Check if the operation buttons on each control cabinet and operation box are sensitive and reliable, and if the emergency stop switch operates effectively.
(12) Power the machine and independently debug each microwave heating unit; run the conveyor belt empty for 15 minutes; observe if all systems operate smoothly and in coordination.
(13) Set the temperature, pressure, belt speed, and other parameters on each panel according to process requirements, and check and adjust the microwave operation parameters.
(14) After completing the above operations, the machine can be officially started for production; the startup sequence is to first start the cooling water circulation system, then the material conveyor system and dehumidification system; then the distributor begins feeding, and subsequently, the microwave heating drying system is sequentially activated as the material enters the microwave heating box.
(15) During shutdown, first turn off the microwave power supply of the microwave dryer in sequence, first turning off the high voltage, then the low voltage, while stopping the feeding; after all materials have exited the oven, stop the material conveyor of the microwave dryer, then stop the dehumidification and cooling water circulation systems, and finally cut off the main power supply, cleaning any residual materials inside and outside the microwave drying equipment.
(16) Keep records of the safe operation of the microwave drying equipment and handover records, and promptly repair and report any abnormalities during operation. It is strictly prohibited to operate the equipment with faults or without load.