Ancient Health Preservation and Disease Prevention Secrets Passed Down by Our Ancestors: Cupping Therapy
Cupping therapy, known in ancient times as “Jiao Fa,” is now commonly referred to as “fire cupping” or “cupping therapy.” This method involves creating a negative pressure within a cup through burning, heating, or suction, which is then applied to the skin, resulting in a bruise-like effect to achieve therapeutic goals. It is often used in conjunction with acupuncture and bloodletting therapy.
1. The Four Major Functions of Cupping for Health Preservation and Disease Prevention
Cupping is an ancient folk medical practice that uses cups as tools to expel air through heat, creating negative pressure that adheres to the skin, resulting in a bruise-like effect. Acupuncture points are locations on the body where the qi of the internal organs and meridians is transmitted to the surface, and where pathogenic factors may reside. When preventing and treating diseases, acupuncture points serve as stimulation and response points for treatment, harmonizing qi and blood, balancing yin and yang, and regulating the internal organs to eliminate pathogens. Cupping at acupuncture points can enhance the body’s immunity, prevent and treat diseases. Clinical practice has demonstrated that cupping generally has the following four major functions.
1. Negative Pressure Effect
Researchers both domestically and internationally have found that during the negative pressure suction of cupping, numerous gas bubbles emerge from the skin surface, enhancing local tissue gas exchange. Observations have shown that negative pressure alters the permeability of local capillaries and causes capillary rupture, allowing a small amount of blood to enter the interstitial space, resulting in bruising. Red blood cells are damaged, releasing hemoglobin, leading to a self-hemolysis phenomenon. This self-adjustment of the body produces effects such as promoting qi and blood circulation, relaxing muscles and tendons, reducing swelling and pain, and dispelling wind and dampness, acting as a beneficial stimulus to restore normal function.
2. Warming Effect
The cupping method provides a warming stimulation to the local skin, most notably with large fire cups, water cups, and medicinal cups. The warming stimulation causes blood vessels to dilate, promoting local blood circulation, improving congestion, enhancing metabolism, accelerating the expulsion of waste and toxins from the body, altering the nutritional state of local tissues, increasing the permeability of blood vessel walls, enhancing the phagocytic activity of white blood cells and reticular cells, and boosting local tolerance and the body’s resistance. This results in warming the meridians, dispelling cold, clearing heat, and detoxifying, thereby promoting disease recovery.
3. Regulatory Effect
The regulatory effect of cupping is based on the negative pressure or warming effect. Firstly, it regulates the nervous system. Due to self-hemolysis and other beneficial stimuli, it acts on the peripheral receptors of the nervous system, transmitting signals to the cerebral cortex. Additionally, the warming stimulation of the local skin through skin and vascular receptors reflexively excites the central nervous system, balancing the excitatory and inhibitory processes of the cerebral cortex, enhancing its regulatory function over various body parts, promoting vigorous metabolism in the affected skin and enhancing phagocytic activity, facilitating the restoration of function, and correcting yin-yang imbalances, leading to gradual recovery from disease.
Secondly, it regulates microcirculation and enhances metabolism. The primary function of microcirculation is to facilitate the exchange of substances between blood and tissues, which is significant in both physiological and pathological contexts, and it also enhances lymphatic circulation and the phagocytic capacity of lymphocytes.
4. Bidirectional Beneficial Adjustment Effect
Cupping has a bidirectional beneficial adjustment effect. For example, when cupping at the Zhongwan (中脘) point, if the gastrointestinal tract is in a suppressed state, cupping can stimulate gastrointestinal function; conversely, if the gastrointestinal tract is in an excited state, cupping can inhibit its function. Similarly, when cupping at the Tianshu (天枢) point, if the body experiences constipation, cupping can promote bowel movements; if diarrhea occurs, cupping can help stop it.
2. Simple Acupoint Location Methods to Help You Easily Find Acupoints
Using meridian acupoints is a technical skill and can be seen as a double-edged sword. If the correct acupoint is found and appropriate techniques are applied, various diseases can be alleviated; however, if one is ignorant or only partially knowledgeable, random manipulation can often lead to adverse effects. Therefore, before cupping, one must learn how to accurately locate acupoints.
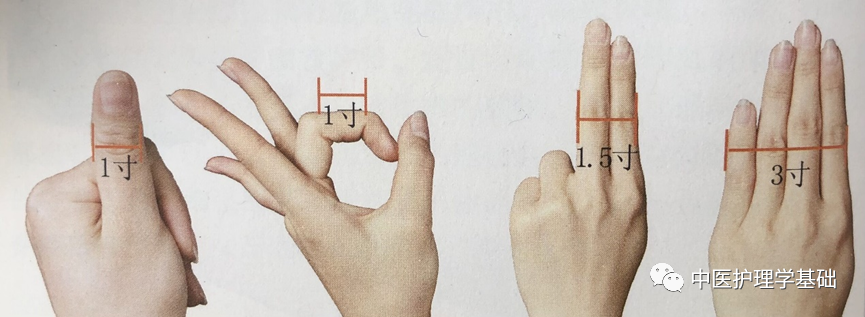
1. Finger Measurement Method
The finger measurement method involves using the patient’s own fingers as a standard for locating acupoints, which is one of the commonly used methods in clinical practice. The term “cun” here differs from the standard measurement unit; it refers to the measurement made using the patient’s fingers. Since individuals vary in height and build, the length of a “cun” measured with fingers will differ among individuals. Therefore, when measuring acupoints, the patient’s fingers should be used as a reference to accurately locate the acupoints.
(1) Thumb Measurement: The width of the thumb’s interphalangeal joint is considered 1 cun.
(2) Middle Finger Measurement: The distance between the inner ends of the lines on the middle finger’s second segment when bent is considered 1 cun.
(3) Horizontal Finger Measurement: Also known as the “One Husband Method,” this refers to the width of the index, middle, ring, and little fingers held together, with the proximal interphalangeal joint of the middle finger as the reference point, measuring 3 cun across.
Additionally, the width of the index and middle fingers together (also known as “Two Horizontal Fingers”) is considered 1.5 cun. The width of the index, middle, and ring fingers together (also known as “Three Horizontal Fingers”) is considered 2 cun.
2. Simple Positioning Method
The simple positioning method is an easy-to-use technique for locating acupoints in clinical practice. For example, standing upright with arms naturally hanging down, the tip of the middle finger touches the area of the lower limb, indicating the Fengshi (风市) point; crossing the hands at the tiger’s mouth, one hand pressing on the wrist bone of the other hand, the tip of the index finger reaches the Lieque (列缺) point, etc. This method serves as an auxiliary technique for locating acupoints.
3. Reference Marking Method
Fixed markers: Common markers for identifying acupoints include eyebrows, nipples, navel, fingernails, toenails, and ankles. For example, the Shenque (神阙) point is located at the center of the abdomen around the navel.
Action markers: These are markers that require specific actions to become apparent, such as opening the mouth to locate the depression in front of the ear, which indicates the Tinggong (听宫) point.
4. Bone Measurement Method
This method is first mentioned in the “Lingshu: Bone Measurement” chapter. It specifies the lengths of various body parts as standards for measuring acupoints. For example, the distance between the anterior and posterior hairlines is 12 cun; the distance between the two nipples is 8 cun; the distance from the lower edge of the sternum to the navel is 8 cun; the distance from the navel to the upper edge of the pubic symphysis is 5 cun; the distance from the anterior (posterior) axillary fold to the elbow crease is 9 cun; the distance from the elbow crease to the wrist crease is 12 cun; the distance from the greater trochanter of the femur to the knee is 19 cun; and the distance from the knee to the outer ankle tip is 16 cun.
3. Common Basic Cupping Methods
There are many cupping methods, each with its own characteristics, indications, and applicable areas. Different cupping methods are employed based on the condition, altering the amount and range of stimulation to achieve the goal of strengthening the body and eliminating disease. Below are detailed descriptions of various cupping methods.
-
1. Regular Cupping Method
Based on the number of cups used during cupping, it is mainly divided into single cup and multiple cups methods.
1.1 Single Cup
This is used for conditions with a smaller area of pathology or tender points. The appropriate size of the fire cup can be selected based on the size of the pathological or tender area. For example, cupping at the Zhongwan (中脘) point for gastric diseases; at the Jianyu (肩髃) point for supraspinatus tendonitis; at the Dazhui (大椎) point and the painful area for stiff neck; at the Jianjing (肩井) point for shoulder periarthritis; and at the Guanyuan (关元) point for menstrual irregularities.
1.2 Multiple Cups
This is used for diseases with a broader area of pathology. Depending on the anatomical characteristics of the affected area, several to dozens of cups can be applied. For example, when a muscle bundle is strained, multiple fire cups can be arranged in a line along the muscle bundle, known as the “排罐法” (排罐法). Cups can also be applied in a grid pattern over the corresponding surface areas of the organs.
2. Flash Cupping Method
The flash cupping method is a commonly used cupping technique in clinical practice, generally applied to areas of the skin that are uneven and prone to cup detachment. The specific operation involves using tweezers or hemostatic forceps to hold a cotton ball soaked in an appropriate amount of alcohol, igniting it, and placing it in the bottom of the cup, then immediately removing it and applying the cup to the treatment area. The cup is then quickly lifted off, and the process is repeated until the skin becomes reddened. Through repeated lifting and applying, the skin undergoes cycles of tightening and loosening, resulting in physical stimulation that excites the nerves and blood vessels, increasing cell permeability, improving local blood circulation and nutrient supply, and is suitable for treating muscle atrophy, local skin numbness, soreness, or some weaker conditions. When using the flash method, ensure the cup opening is always facing down, and the cotton ball is quickly passed through the cup opening to avoid overheating and burning the skin.
3. Sliding Cupping Method
The sliding cupping method, also known as the moving cupping method, pushing cupping method, or gliding cupping method, is best performed with glass or ceramic cups with smooth openings to prevent skin abrasions. The specific operation involves applying an appropriate amount of lubricant to the area to be treated, then using the flash method to attach the cup to the skin, sliding the cup back and forth along the meridian or the desired cupping path until bruising appears on the skin. During the operation, the negative pressure inside the cup should be adjusted according to the patient’s condition and constitution, as well as the speed and pressure of the sliding. The negative pressure should not be too high, as this may cause significant pain during sliding; when pushing the cup, gently push the back of the cup neck with even force to prevent the cup from falling off.
The sliding cupping method should be adapted to different body parts: for the lumbar and back areas, push and pull in a vertical direction; for the chest and sides, push and pull parallel to the ribs; for the shoulders and abdomen, use a rotating or moving method; and for the limbs, push and pull along the long axis.
4. Rotating Cupping Method
The rotating cupping method involves first using the flash method to attach the cup to the skin, then holding the cup body and rotating it back and forth. The technique should be gentle, and the rotation should be smooth to prevent the cup from falling off. The angle of rotation should be moderate; if too large, the patient may not tolerate it, and if too small, it may not provide sufficient stimulation. The rotating cupping method can produce greater pulling stimulation on acupoints or skin, enhancing blood circulation and treatment effects, and is therefore often used for acupoint treatment or local conditions. Ensure the cup opening is smooth to avoid skin abrasions during rotation. The rotating cupping method can be combined with the sliding cupping method, applying an appropriate amount of lubricant to reduce pain.
5. Sound Cupping Method
The sound cupping method refers to a technique where, after the cup is secured, it is slightly pushed or pulled, then forcefully removed to produce a “pop” sound. This process is repeated multiple times until the skin becomes reddened or purplish. This method has similar effects to the flash cupping method and is typically performed with small diameter cups on smaller areas.
4. Tools Required for Cupping
Many people wish to have family members assist with cupping at home for health maintenance and toxin elimination, but choosing the right cupping tools can be a challenge. Below are methods for correctly selecting cupping tools.
1. Common Cups
Glass Cups: Glass cupping is currently the most commonly used cupping tool at home, available at major medical supply stores. They are made of glass and generally come in large, medium, and small sizes. They are spherical in shape, with an open bottom and a wide mouth. The advantages are that the cup opening is smooth, and the transparent material allows observation of the degree of skin reddening and bruising during use; the disadvantage is that they are fragile.
Vacuum Cups: Vacuum cups are often made from penicillin or streptomycin bottles, with the bottom ground smooth to create a flat opening, and the rubber stopper at the top should remain intact for suction. Ready-made vacuum suction cups are also available in medical supply stores, made from organic glass or transparent engineering plastic, shaped like a bell with a piston for easy suction adjustment. The advantages are that they do not require ignition, preventing burns, are safe to use, allow for adjustable internal negative pressure, and are easy to observe. They are the most suitable vacuum cups for home use.
Bamboo Cups: Bamboo cups are made by cutting mature bamboo with a diameter of 3-5 cm at the joints, leaving one end intact as the bottom and smoothing the opening at the other end. The cups are slightly wider in the middle and taper at both ends, resembling a waist drum, approximately 10 cm long, with openings of 5 cm, 4 cm, and 3 cm in diameter. Their advantages are that they are lightweight and inexpensive.
2. Auxiliary Tools
Fuel: Alcohol is commonly used as fuel during cupping. It is generally recommended to use alcohol with a concentration of 75%-95%. If alcohol is unavailable, a higher-proof liquor can be used as a substitute.
Disinfectants: Before cupping, prepare some disinfecting supplies to clean the tools and the cupping area, such as cotton swabs or alcohol-soaked cotton balls. Additionally, these can be used for igniting and venting.
Lubricants: Common lubricants include petroleum jelly, vegetable oil, and paraffin oil. Some lubricants also have medicinal effects, such as safflower oil, turpentine, and massage creams, which have effects of promoting blood circulation, relieving pain, and disinfecting.
Needles: During cupping treatment, needles such as three-edged needles, skin needles, syringes, small scalpels, thick needles, ceramic pieces, and rolling needles may be used. The most commonly used are the three-edged needle and skin needle.
5. Precautions for Cupping
There are many considerations during cupping, such as preparation before cupping, optimal positioning, selection of cups, duration of cupping, and methods, all of which affect the effectiveness of cupping in disease elimination. Below is a brief introduction to the precautions for cupping.
1. Prepare for Cupping
Carefully examine the patient to determine if they meet the indications for cupping, and based on the condition, establish a treatment plan. Prepare the necessary supplies, such as alcohol, cotton balls, hemostatic forceps, lighters, and cups. Additionally, some special cupping methods may require other corresponding items.
2. Choose the Optimal Position
The patient’s positioning significantly affects the effectiveness of cupping. Correct positioning ensures the patient is comfortable, and the treatment area is fully exposed for easy operation. The position should be determined based on the severity of the condition, the patient’s constitution, the size of the affected area, age, and skin elasticity. Common positions include:
Supine Position: The patient lies flat on their back, with both arms resting naturally at their sides. This position is suitable for cupping on the chest, abdomen, both upper limbs, both lower limbs, and head and face.
Prone Position: The patient lies face down, with both arms resting naturally at their sides. This position is suitable for cupping on the back, waist, buttocks, and the back of both lower limbs.
Side-Lying Position: The patient lies on their side, with the same side leg bent and the other leg extended, and both arms bent and placed in front of the body. This position is suitable for cupping on the shoulder, arm, buttock, and outer thigh.
Sitting Position: The patient sits backward on a chair with a backrest, with both arms naturally overlapping and resting on the chair back. This position is suitable for cupping on the neck and shoulder.
3. Selection of Cups
Select appropriate cups based on the size of the cupping area, the patient’s constitution, and the severity of the condition.
4. Cleaning and Disinfecting
Before cupping, clean the treatment area with a towel soaked in warm water, then dry with a clean cloth. To prevent burns, alcohol or iodine should generally not be used for disinfection. If cupping in hairy areas or near hair, shaving may be necessary.
5. Warming the Cups
In cold weather during winter, late autumn, and early spring, to prevent the patient from feeling cold during cupping, the cups can be pre-warmed over a fire. When warming the cups, only the bottom should be heated, avoiding overheating the opening to prevent burns. The cups should be warmed to a temperature that is not cooler than the skin or slightly above body temperature.
6. Performing the Procedure
First, expose the selected area, and the practitioner should be close to the patient, holding the cup (either left or right) to apply it using different methods. Generally, there are two placement methods:
(1) Close Placement: The distance between cups should not exceed 1 cun. This is used for strong patients with pain symptoms. It has a sedative, analgesic, and anti-inflammatory effect, also known as the “stimulating method.”
(2) Sparse Placement: The distance between cups should be 1-2 cun apart. This is used for weak patients, those with numbness, or weakness. It is also known as the “weak stimulating method.”
7. Inquiries
After cupping, continuously inquire about the patient’s feelings. If the suction is too strong and causes pain, a small amount of air should be released. If the patient feels weak after cupping, they may need to repeat the procedure.
6. Important Details to Consider During Cupping
Cupping is a relatively ancient method of treatment, generally applicable to the same conditions as acupuncture and massage. However, during cupping, it is essential to grasp the precautions and important details to facilitate operation and maximize the effects of cupping for better therapeutic outcomes.
(1) Maintain an indoor temperature above 20°C during cupping. Especially for patients who need to expose their skin, avoid drafts to prevent colds. It is best to perform cupping in a wind-sheltered, sunny area.
(2) The patient should primarily be in a prone position, fully exposing the treatment area of the skin.
(3) Choose appropriate cupping areas or acupoints, generally favoring areas with ample muscle, sufficient subcutaneous tissue, and less hair.
(4) During cupping, avoid moving the patient’s position to prevent the cups from falling off. When using multiple cups, ensure they are not placed too close together to avoid pulling the skin and causing strain.
(5) Do not perform cupping on areas with residual marks from previous cupping until they have faded.
(6) If the suction is too strong, press the edge of one side of the cup to release a little air. First-time users of flash cupping or elderly patients should use medium or small cups.
(7) The order of cupping should be from top to bottom, with smaller cups placed above larger ones.
(8) For patients with mild conditions or sensory disturbances (such as lower limb numbness), the cupping duration should be shorter. For severe conditions, long-standing issues, deep lesions, or significant pain, the cupping duration can be extended, and suction can be slightly stronger.
(9) When using fire to vent during needle cupping or bloodletting cupping, ensure that the alcohol has completely evaporated before cupping to avoid burns.
(10) When leaving needles in during cupping, prevent muscle strain that could cause bending or breaking of the needles; if this occurs, promptly remove the cup and the needles.
(11) During cupping, closely monitor the patient’s reactions. If symptoms such as dizziness, nausea, vomiting, pallor, cold sweat, or cold limbs occur, or if blood pressure drops or breathing difficulties arise, promptly remove the cups, lay the patient flat, elevate their legs, and provide a small amount of warm water for mild cases. For severe cases, acupuncture at the Renzhong (人中) and Hegu (合谷) points may be necessary to improve blood circulation. If needed, seek medical attention promptly.
(12) If blisters occur due to prolonged cupping or excessive suction, apply gentian violet and cover with gauze. If the blisters are large, use a syringe to extract the fluid and then apply a disinfectant gauze dressing.
7. Indications and Contraindications for Cupping
After thousands of years of improvement and refinement, cupping therapy has evolved from being used solely for surgical diseases to being applicable for internal medicine, surgery, gynecology, pediatrics, orthopedics, dermatology, and more. Nevertheless, as a treatment method, cupping has its limitations. Therefore, it is essential to recognize the indications and contraindications before performing cupping.
1. Indications for Cupping
(1) Internal Medicine Diseases: Colds, coughs, pneumonia, asthma, palpitations, insomnia, excessive sleep, forgetfulness, whooping cough, gastric pain, vomiting, acid reflux, hiccups, chronic gastritis, diarrhea, constipation, abdominal pain, gastric prolapse, dizziness, flank pain, chest tightness, edema, urinary difficulties, urinary retention, nocturnal emissions, premature ejaculation, impotence, male infertility, abnormal penile erection, acute exogenous febrile diseases.
(2) Surgical Diseases: Erysipelas, furuncles, mastitis, rectal prolapse, acute appendicitis, acute biliary colic, acute pancreatitis, acute ureteral stones.
(3) Orthopedic Diseases: Stiff neck, cervical spondylosis, lumbar disc herniation, lumbar spinal stenosis, lumbar muscle strain, acute lumbar sprain, shoulder periarthritis, cervical shoulder fibrositis, lateral epicondylitis, sciatica, lateral femoral cutaneous nerve inflammation, costochondritis, intercostal neuralgia, rheumatoid arthritis, etc.
(4) Gynecological Diseases: Irregular menstruation, early or late menstruation, irregular menstrual cycles, excessive or insufficient menstrual flow, amenorrhea, dysmenorrhea, abnormal vaginal discharge, pregnancy-related vomiting, postpartum lactation deficiency, postpartum abdominal pain, abortion syndrome, menopausal syndrome, uterine prolapse, pelvic inflammatory disease, vulvar itching, infertility, postpartum constipation, postpartum fever, etc.
(5) Pediatric Diseases: Fever, vomiting, diarrhea, anorexia, night crying, nocturnal enuresis, whooping cough, mumps, etc.
(6) Dermatological Diseases: Herpes zoster, psoriasis, alopecia areata, eczema, urticaria, skin itching, scabies, neurodermatitis, vitiligo, etc.
(7) Otolaryngological Diseases: Stye, tearing, trachoma, eye itching, red and swollen eyes, cataracts, hyperopia, myopia, optic nerve atrophy, nasal congestion, sinusitis, epistaxis, sore throat, oral ulcers, toothache, temporomandibular joint dysfunction syndrome.
2. Contraindications for Cupping
(1) Skin infectious diseases, severe skin allergies, or skin lesions.
(2) Individuals who are intoxicated, overly hungry, overly full, excessively thirsty, or overly fatigued.
(3) Patients with malignant tumors, severe heart disease, heart failure, or active pulmonary tuberculosis.
(4) Conditions with poor coagulation function, such as purpura, thrombocytopenia, leukemia, hemophilia, etc.
(5) Patients with renal failure or cirrhosis with ascites.
(6) Trauma, fractures, edema, varicose veins, or areas over major blood vessels.
(7) Pregnant women should avoid cupping on the abdomen, lower back, and breasts; gentle techniques should be used on other areas.
(8) Cupping should be avoided on the face, genitalia, nipples, navel, and areas with dense hair.
8. Health Conditions Represented by Cupping Marks
After cupping for a certain period, the skin color and shape will change, forming cupping marks. These marks can be red, purple spots, or even deep red, purple-black, or blue spots, which may be slightly painful to the touch. Due to individual differences in constitution and health status, the color and shape of cupping marks will vary from person to person. Below is a brief introduction to the health conditions represented by cupping marks.
After cupping, different marks indicate different health conditions and recovery states, roughly categorized as follows:
(1) Small red-purple spots with varying degrees of heat and pain or slight moisture are normal cupping marks, which typically disappear within 1-5 days.
(2) If there are no cupping marks or they are not prominent, or if they disappear immediately after cupping, it indicates that the body is generally normal or the condition is mild.
(3) Bright red marks indicate yin deficiency or deficiency of both qi and yin, which may also occur with excess yin fire.
(4) Bright red marks accompanied by fever indicate the presence of heat toxins in the body.
(5) Purple-red or purple-black marks indicate the presence of heat toxins or blood stasis in the body.
(6) Purple-red or purple-black marks with moisture indicate the presence of damp heat in the body.
(7) Purple marks with patches or darkened marks indicate local cold and blood stasis. If the marks do not fade after several days, it usually indicates a long-standing condition that requires extended treatment.
(8) If large areas of black-purple marks appear during sliding cupping, it indicates extensive wind-cold invasion.
(9) If wheals appear during sliding cupping, resembling acute urticaria, it suggests that the patient is affected by wind pathogens or may have an allergic constitution.
(10) Light purple or blue marks with patches indicate an external invasion of wind-cold.
(11) Scattered purple spots of varying depths indicate qi stagnation and blood stasis.
(12) If there are small water droplets or moisture inside the cup after cupping, it indicates the presence of dampness in the body. If many small blisters appear in the affected area, it suggests dampness.
(13) If bright red scattered spots appear concentrated around a specific acupoint after cupping, it indicates abnormalities or conditions related to the corresponding organ.
(14) Light purple marks with patches indicate a primarily deficient condition with blood stasis. If the spots are prominent at the acupoint, it suggests weakness of the related organ. If it appears at the Shenshu (肾俞) point, it indicates kidney deficiency.
(15) During the course of cupping treatment, as the condition improves, the cupping marks will also lessen, and fewer marks will appear, indicating improvement in the condition.
This content is excerpted from “Illustrated Guide to Acupoint Cupping”